What Matters Most
|
If there’s a quality we value at Shugarman’s Bath, it’s transparency. We understand the stress that comes with not knowing what comes next after signing the contract for your tub or shower remodel. That’s why we created this guide to help you understand what happens between now and the moment you turn on your shower or step into your brand-new bathtub.
This will start with pre-installation, the step-by-step breakdown of what to expect during installation day, and post-installation.
Bathtub or Shower Pre-Installation
Here are the next steps after signing your contract:
Welcome and Project Confirmation
Once your contract is fully processed, you’ll receive a welcome email from our operations team. It’s our way of saying, “Welcome aboard and thank you for being part of the Shugarman’s Bath family!” This message will also confirm that your project is in production and provide you with the next steps as we prepare for your remodel.
Internally, Shugarman’s Bath will complete a production review, which means we double-check your design selections, measurements, and materials. Once everything is verified, your project is moved into purchasing, meaning your materials are officially ordered.
Finally, you’ll receive another quick update when everything arrives and is inspected. At this point, we’ll call you to schedule your installation date.
Scheduling and Preparation
A few days before your install, you’ll receive a reminder email with the following details:
- Your installation date, with an expected arrival time from the crew.
- The name(s) of your installers.
- Tips to help you prepare for the installation.
- Removing wall hangings, rugs, decor near the work area, etc.
Keep in mind that most projects are completed in 1-2 days. Larger or custom remodels can take a little longer.
Note: Unexpected issues can be found behind your walls. Our teams sometimes find problems such as moisture damage, rot, mold, live pests, or other plumbing issues. With whatever we find, our team will explain the problem and keep you informed about any timeline adjustments. And you will not be charged extra if we find any of these issues in your bathtub/shower area. All part of our Never Any Extras Guarantee.
What Happens During the Bath or Shower Installation Day(s)?
The big day(s) have arrived. Your installers arrive and are ready to get to work. Here is what you can expect on the day(s) of your installation.
Watch our 45-second time-lapse of the full 1-2 day installation process to see what to expect.
Step 1: Pre-Arrival Preparation (Warehouse Stage)
Before installers arrive at your home, your materials are double-checked at the warehouse. Like you, we want to make sure everything matches your contract.
They’ll then text or call you when they’re on the way and give you an ETA.
Step 2: Arrival and Pre-Installation Walkthrough
When your Shugarman’s Bath installers arrive, they’ll greet you, walk through the plan, and confirm the details before starting your install.
You and your installer will:
- Review your contract and confirm all the design details.
- Double-check measurements to make sure everything will fit perfectly.
- Decide where the team will set up and discuss how we can best protect your home.
Step 3: Demolition Time
Next, and debatably one of the most fun portions, the installation team will remove your old bathtub or shower.
This part of the installation will show us what’s behind the walls. We could find hidden issues like moisture damage, mold, or living pests (like termites). If anything is found, we’ll show you what it was and explain how to fix it before moving forward.
The demolition portion can be loud. You’re welcome to stay in your home as it happens, but there will be plenty of noise.
And if you’re concerned about your home getting dusty and dirty after the demolition, we make sure everything is contained to the bathroom during this process. We also make sure everything is cleaned up in the area afterward. We don’t want to work in a dirty space. And we don’t want you to have a messy home.
Step 4: Replacing the Damaged Studs and Subfloor (If Needed)
Once the area is cleared and outstanding issues are addressed, we’ll replace damaged studs and repair the subfloor if needed. This is to add extra support where accessories such as grab bars, niches, or doors will be installed.
We want to be sure the foundation of your space is in great shape before building anything on top of it.
Step 5: Plumbing
We also update your plumbing system in the bathtub or shower area. This means replacing the shower valve and P-trap. We also inspect the copper and replace it if necessary. We want to make sure your shower or tub works wonderfully for years without issues.
Step 6: Base Installation
When steps four and five are complete, your installer will put the new shower or tub base in place.
We want your foundation to be perfectly level and secure. When everything is good, the base is tightly sealed along the floor and walls to keep moisture from getting underneath. We want you to have lasting quality with zero leaks.
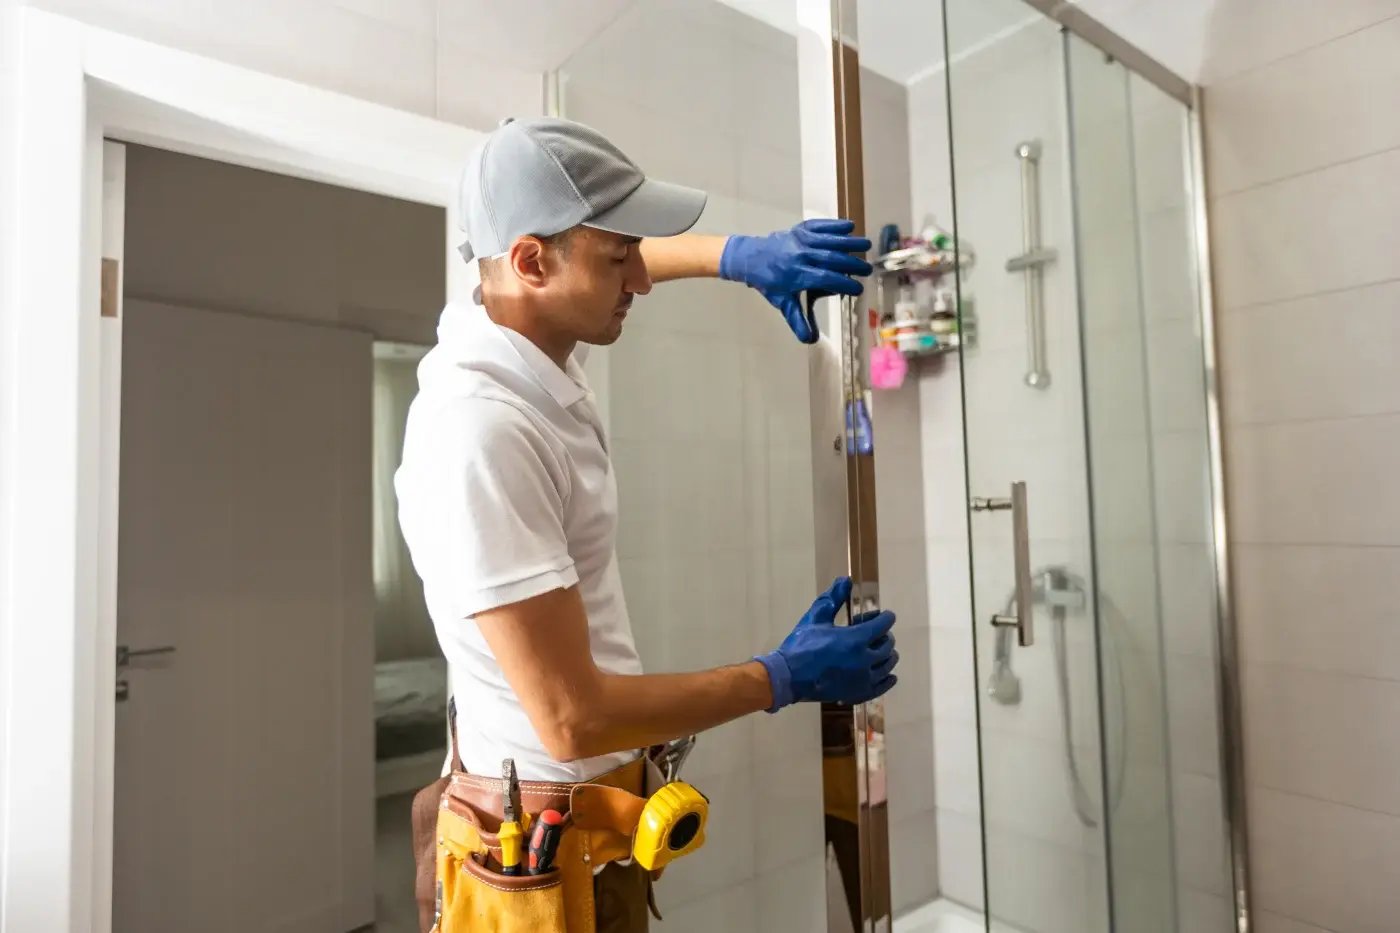
Step 7: Wall Installation
Once the base is installed, we put in your multi-layer wall system.
- First Layer
-
- We have to make sure your walls are waterproofed properly. Your installer starts by attaching DensShield, which is an ideal backer board for high-moisture areas because it has a built-in moisture barrier that stops moisture at the surface. This moisture-resistant backer board is attached directly to the wall studs.
- Corner Reinforcements
-
- The team adds flashing strips in all corners after the backer boards are in place. This is extra sealing placed in every corner.
Wall panels are locked in so that high-pressure water areas are essentially watertight.
- The team adds flashing strips in all corners after the backer boards are in place. This is extra sealing placed in every corner.
- Final Layer: Your Custom BP-Cor2 Walls
- Your custom BP-Cor2 wall panels are templated, trimmed, and installed. Each panel is cut on-site to fit the contours of your bathroom. This includes windows, shelves, and storage niches.
- The installers apply a high-strength adhesive that bonds the BP-Cor2 to the DensShield layer.
.jpg?width=500&height=375&name=IMG_4566_(1).jpg)
Step 8: The Finishing Touches
Your installers will apply the showerhead(s), grab bar(s), niches, window kits, and doors. Every edge will be sealed with silicone to tie everything together and make the area look nice.
They also test everything installed to make sure everything operates properly.

Step 9: Your Final Walkthrough
The crew walks through everything with you after the bathtub or shower installation is finished. We want to be sure you are 100% satisfied before the team leaves.
Here’s what happens during that walkthrough:
- System Check: The installer runs the water to confirm proper temperature and pressure. If you have a shower and bathtub, they’ll show you how to switch between showerheads or the tub diverter.
- Hardware Demonstration: You’ll learn how the shower doors open and close (yes, you do want to know this), see that the handles and fixtures move smoothly, and check that accessories like grab bars and niches are positioned correctly.
- Care guidance: Your installer walks you through the cleaning and maintenance form.
-
- This form explains which cleaners are safe, how to prevent residue buildup, and how often to wipe down surfaces.
- Completion Form: When you’re happy with everything, you’ll sign a completion form that confirms the remodel is up to your expectations. The installer takes a quick photo of the form for company records. The physical copy is yours.

Post-Installation: When the Installation Team Leaves
When your installers pack everything up, make sure the working areas are spotless, and drive off, there are a few steps that happen behind the scenes and on your end:
1. Project Documentation and Warranty Activation
Your signed completion form triggers the final project closeout in our system. This also activates your lifetime warranty on both labor and materials. Your paperwork and job records are automatically linked to your warranty coverage.
2. Quality Review and Follow-up
Our operations and customer care team review every completed project to make sure they meet Shugarman’s Bath quality standards. We’ll contact you directly if anything needs fine-tuning or follow-up.
You’ll also receive a courtesy email or call a few days later to confirm that everything is performing well.
3. Cleaning, Care, and Long-Term Maintenance
The space is yours to enjoy again! Be sure to follow the cleaning guide provided during your walkthrough.
We make your remodeled tub or shower easy to clean. While you do still need to maintain your new remodel, you don’t have to do menial tasks, like scrubbing tile. You save so much time, especially with how easy it is to clean the area now.
Helpful tip: Use gentle, non-abrasive cleaners and soft cloths. Harsh or acidic cleaners can damage the newly installed materials.
If you spot an issue or want a quick checkup, reach out to Shugarman’s Bath before hiring any outside contractors. Hiring another company after the installation could void your bathtub or shower warranty.
4. Share Your Experience
Regardless of your experience, we would love to hear your feedback. We’re always looking to see what’s working well and what can be improved.
Plus, you’re helping other homeowners feel more confident in their remodeling decision. Whether they choose Shugarman’s Bath or go somewhere else, your feedback can help someone make a big decision.
The Most Important Step: Enjoy Your New Space
That’s it. The remodel in your bathtub or shower area is done! We want to leave you with a beautiful shower or bathtub and peace of mind.
All of our projects are backed by years of experience. Every system we install is made to last, protected by our lifetime warranty, and is protected by a team that takes pride in its work. Now, enjoy the comfort of your new space! You’ve more than earned it.
If you have questions or want advice on cleaning or maintenance, don’t hesitate to reach out, even long after installation day is over. Our goal is to make you happy.
The opinions expressed in the referenced materials are those of the authors only, not necessarily of Shugarman’s Bath. While these referenced materials are useful in answering generalized questions, each bathroom is unique. For a particular question about your tub or shower remodeling project, contact your Shugarman’s Bath consultant.
FAQs on Tub and Shower Remodeling:Q: How many design options does Shugarman's Bath offer?Shugarman's Bath offers 500-600 color and style options, so you can find a combination that fits your bathroom and your taste. Q: Does Shugarman's Bath Do Repair Work?No, Shugarman's Bath does not do general repair work. The reason is that repairs are temporary fixes that buy time but do not solve the underlying problem. Most homeowners end up paying for the same repair more than once, or eventually replacing the materials anyway after spending money trying to maintain them. Q: Do you remodel the whole bathroom or just the tub and shower area?We're specialists in the tub and shower area. That's where our focus stays. For other parts of your bathroom, we work with trusted contractors regularly and can refer you to the right people at no extra charge. That referral can save you 10-20% on a larger project. |
Topics:
